Learning how to use virtual keyboard within Reaper enables you to create music by using your computer or laptop’s built-in keyboard. This serves as a convenient option for those who don’t have a physical MIDI controller, allowing beginners to play and record virtual instruments without the need to invest in extra hardware. Wondering how to use Virtual Keyboard in Reaper? Keep on reading.
Does Reaper Have a Virtual Keyboard?
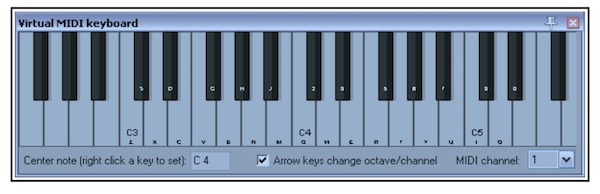
Reaper features a tool known as the Virtual MIDI Keyboard, which transforms your standard computer or laptop keys into an interactive interface linked to your software instruments. This offers users the flexibility to program and record MIDI in a more intuitive manner, as opposed to manually inputting data into the piano roll. Additionally, there is no requirement to acquire an external MIDI controller if you prefer not to.
What Do You Need to Use Virtual Keyboard in Reaper?
In essence, all you require are your computer keyboard (or mouse) and a virtual instrument to generate the desired sounds. You can produce individual notes by clicking with the mouse, but it’s more convenient to utilize your Mac/PC keyboard to simulate playing your instruments. Reaper simplifies this process by assigning letters to piano keys and presenting them visually, ensuring you have precise control over the notes you’re producing.
How To Use Virtual Keyboard in Reaper
How To Pull Up Virtual Keyboard in Reaper
There are two methods to access this functionality in Reaper. The first involves going to the View menu and choosing “Virtual MIDI Keyboard.” The second approach is to utilize the keyboard shortcut [Alt] + “B” on a PC or [Option] + “B” on a Mac. Familiarizing yourself with the shortcuts in your DAW is a wise practice, as it allows for swift and effortless access to various functions. In this context, committing the relatively straightforward key command to memory can be particularly beneficial if you regularly work with virtual instruments.
How To Configure Your Settings
The process can become a bit more complex when it comes to configuring settings, but we’ll clarify it step by step. Let’s begin by creating a new track and selecting an instrument plugin to load. Go to the Insert menu and choose “Virtual Instrument on New Track.” This action will open a dialogue box where you can locate your desired plugin. Click on “Add” when you’re ready to create a new track with the instrument inserted into it.
Next, you’ll need to prepare the track for recording (for those unfamiliar with this step, refer to the comprehensive guide below) and configure the Inputs. Access the track’s Inputs and navigate to Input: MIDI > Virtual MIDI Keyboard > All Channels. This configuration ensures that the instrument track receives its triggers from the virtual keyboard.
At this stage, you’re all set to record using Reaper’s highly convenient Virtual MIDI Keyboard.
Connecting a MIDI Device
There may come a point when you prefer to utilize a dedicated MIDI controller for your production tasks instead of Reaper’s virtual MIDI keyboard. Employing a MIDI device offers numerous advantages and can potentially enhance your workflow significantly.
To begin, the first step is to connect your MIDI device to your computer. In Reaper, access the Preferences menu from the Options tab or use the keyboard shortcut [Command] + “,”. While in the Preferences menu, navigate to the MIDI Devices tab. Reaper should automatically detect your connected device and display it twice in this tab: once under the input section and again under the output section.
Subsequently, it’s necessary to activate the MIDI device’s inputs and outputs. Achieve this by right-clicking on the device’s name under the input section and selecting “Enable Input.” Similarly, on the output side, right-click on the device’s name and choose “Enable Output.”
Lastly, once you have created an instrument track, configure its Input to match the appropriate MIDI device. Locate your device by name and select “All Channels.” Now, you are ready to use a MIDI controller to record virtual instruments in Reaper.
Can I Use My Computer’s Keyboard as a MIDI Keyboard in Reaper?
Reaper provides the convenient Virtual MIDI Keyboard as a substitute for external MIDI hardware devices. With your computer keyboard, you have the ability to both play and record software instruments.
Conclusion
In conclusion, Reaper offers versatile options for music creation, whether you choose to use the Virtual MIDI Keyboard with your computer keyboard or opt for a dedicated MIDI controller. The Virtual MIDI Keyboard provides a user-friendly way to start playing and recording virtual instruments, making it accessible to beginners without the need for additional hardware. For those who later decide to enhance their workflow, connecting a MIDI device offers added flexibility and creative possibilities in the world of music production within Reaper. Ultimately, the choice is yours, and Reaper accommodates both approaches to suit your preferences and needs.